

Daisy Granny Square Crochet Pattern
Some patterns grab you the moment you see them, and the daisy granny square is one of those. A bright yellow center, a ring of crisp white petals, and a neat green square around it, all in a motif small enough to finish in one sitting.
In this guide I’ll walk you through a simple daisy granny square pattern from the first magic ring to the last woven-in end. Then we’ll look at how to turn a pile of squares into a cozy daisy granny square blanket, with advice on yarn, color, joining, and edging. Whether this is your first granny square or your fiftieth, you’ll find something useful here.
Table of Contents
Why This Daisy Granny Square Pattern Works
There are many versions of a crochet granny square flower out there, and plenty of them look lovely but are fiddly to make. This one was built around three goals: easy to read, easy to repeat, and easy to join.
The petals are worked as simple chain loops with a small cluster of stitches in each, so you don’t need puff stitches or special techniques. The green background is worked into the back loops of the center round, which tucks it neatly behind the petals and gives the flower a gentle raised look. And because every square follows the same five rounds, the pattern is easy to memorize, which matters when you’re making dozens for a blanket.
What You’ll Need
- Yarn: Worsted weight (medium 4) in yellow, white, and green, plus an optional border color. Cotton gives crisp petals, while acrylic and cotton blends are softer and cheaper.
- Hook: 4 mm (G-6). Size up or down to suit your tension.
- Notions: A yarn needle, scissors, and a stitch marker if you like to keep track of your rounds.
One square uses only a few yards of each color, so this is a great way to use up leftovers. If you’re planning a blanket, pick a machine-washable yarn from the start.
Abbreviations (US Terms)
ch chain, sl st slip stitch, sc single crochet, dc double crochet, sp space, st stitch, FLO front loop only, BLO back loop only.
The Daisy Granny Square Pattern
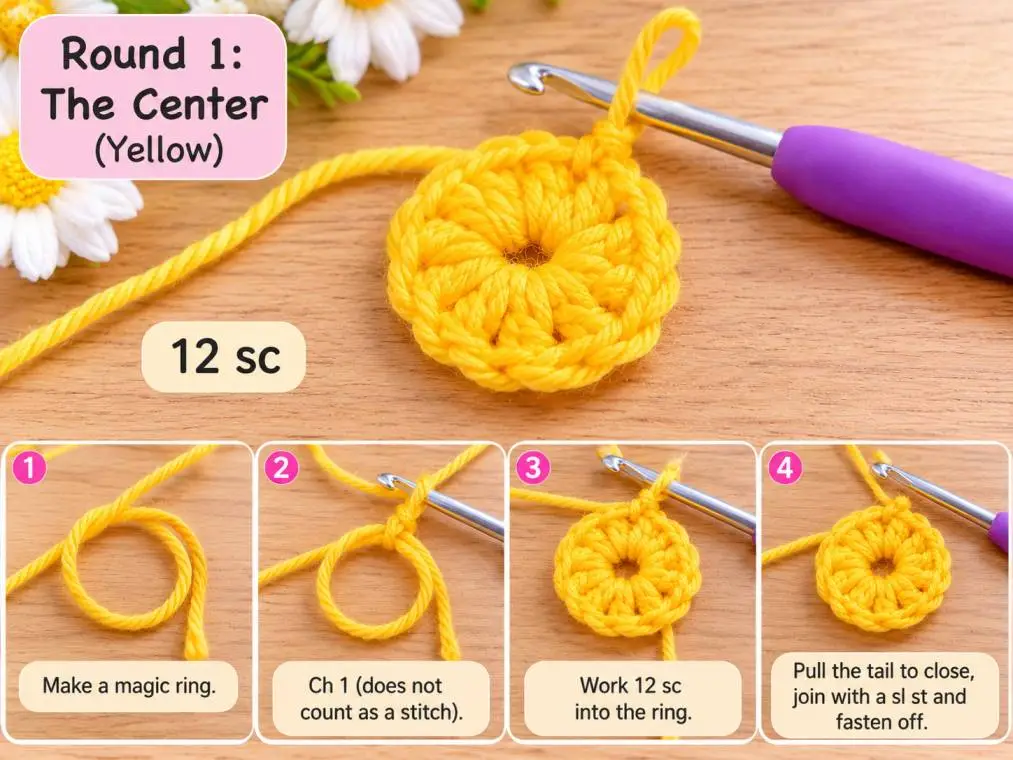
Round 1: The Center (Yellow)
Make a magic ring. Ch 1 (this does not count as a stitch), then work 12 sc into the ring. Pull the tail to close the ring and join with a sl st to the first sc. Fasten off. You have 12 sc.
If the magic ring gives you trouble, ch 4 and join with a sl st to make a ring instead. The center will just be a little larger.
Round 2: The Petal Loops (White)
Look at the top of the center and you’ll see two loops on every stitch. This round goes into the front loops only. The back loops stay free for Round 4.
Join white with a sl st in the FLO of any sc. Ch 3, sl st in the FLO of the next sc. Repeat from * to * 10 more times, then ch 3 and sl st in the same stitch where you joined. You now have 12 small loops. Don’t fasten off.

Round 3: The Petals (White)
Now the loops become petals. Work (sl st, ch 2, 3 dc, ch 2, sl st) in the first ch-3 space. Repeat in each of the remaining 11 spaces. Your last petal ends with a slip stitch, so there is nothing to join. Fasten off.
Twelve petals will fan out around the center. They may look a little crowded at this stage. A gentle tug and a quick press with your fingers will settle them.

Round 4: The Green Background
Turn the square so the petals face you, then look at the back loops of Round 1. They sit just behind the petals. Join green with a sl st in the BLO of any stitch and count that stitch as stitch 1.
Ch 3 (counts as a dc), dc in the same stitch, ch 2, 2 dc in the same stitch. That is your first corner. Dc in the BLO of each of the next 2 stitches, then work (2 dc, ch 2, 2 dc) in the BLO of the next stitch. Repeat from * to * 2 more times. Dc in the BLO of the last 2 stitches and join to the top of the starting ch 3. Fasten off.
You now have 24 dc and four ch-2 corners. The petals will sit on top of the green, which is exactly the look we want.

Round 5: The Border (White or Yellow)
Join your border color in any corner space. Ch 3 (counts as a dc), then work (dc, ch 2, 2 dc) in the same space. Dc in each of the next 6 stitches, then work (2 dc, ch 2, 2 dc) in the next corner space. Repeat from * to * 2 more times. Dc in each of the last 6 stitches and join. Fasten off. You should have 40 dc.
Weave in your ends and block the square. It should measure about 4 inches across with worsted yarn and a 4 mm hook.
Tips for Neater Daisy Squares
- Find the back loops easily. Before starting Round 4, tilt the square toward you. The free loops look like a little ridge behind the petals.
- Keep your chains loose. Tight petal loops pull the center up and make the square cup. If that happens, go up a hook size for Rounds 2 and 3.
- Count at the end of each round. The stitch counts above are your safety net.
- Weave in ends as you go. Do it right after each color change and you’ll thank yourself later.
- Block every square. Pin each one to shape and steam it or mist it with water. Blocking evens out the petals and gives you sharp corners, which makes joining far easier.
From Single Square to Daisy Granny Square Blanket
A single square is a coaster. A hundred of them is an heirloom. If you plan to make a daisy granny square blanket, a little planning at the start saves a lot of frustration.
Decide on a size first. With 4-inch squares, a 6 by 8 layout (48 squares) gives a baby blanket of roughly 24 by 32 inches before the border. A 10 by 12 layout (120 squares) gives a throw of about 40 by 48 inches. Add the border and you gain a few more inches on every side.
Keep the background consistent. Changing the daisy colors while keeping the green background the same makes the blanket look cohesive, like a meadow. Or flip it: keep the daisies white and vary the background color for a patchwork effect.
Lay out your squares before joining. Arrange them on the floor or bed and step back. Spread colors evenly so no single shade clumps together.
Choose a joining method. Whip stitch is quick and nearly flat. Slip stitch joining gives a raised seam that looks like a grid. Join-as-you-go skips the sewing step entirely, which is handy if you hate finishing.
Finish with a border. Two or three rounds of dc around the whole blanket, in white or green, frame the daisies nicely. Finish with a round of sc or a simple scallop for a soft edge.
Wash it gently. Cool water and a gentle cycle will keep the petals fresh. Lay the blanket flat to dry.
Color Combinations to Try
- Classic daisy: yellow center, white petals, green background
- Sunset garden: orange center, cream petals, plum background
- Soft pastel: peach center, ivory petals, sage background
- Bright and bold: pink center, yellow petals, turquoise background
If you have a stash of leftovers, a granny flower square pattern is the best excuse to use it. Choose one background color, let the flowers vary, and you’ll have a blanket that looks planned even when it came from scraps.
Frequently Asked Questions
Is this good for beginners?
Yes. If you can chain, slip stitch, and double crochet, you can make it. The magic ring is optional, because you can start with a simple chain ring.
How many squares do I need for a blanket?
It depends on size. Around 48 squares make a baby blanket, and about 120 make a comfortable throw, based on 4-inch squares.
Can I use a different yarn weight?
Absolutely. Sport weight with a smaller hook makes a dainty square, and bulky yarn with a larger hook makes a big, fast one. Just remember that the size of every square will change, so recalculate your blanket layout.
What if my petals look uneven?
That is almost always fixed by blocking. If it still bothers you, check that your Round 2 loops are all the same length.
Final Thoughts
A daisy is a simple flower, and that is exactly why it works so well in a granny square. This crochet daisy pattern is quick to learn, forgiving to make, and flexible enough for anything from a coaster to a full blanket.
Pick your three colors, make one square tonight, and see how it feels in your hands. Chances are you’ll be reaching for a second one before the evening is over. Happy crocheting!
This article will help you understand the Daisy Granny Square crochet pattern: Easy Crochet Flower Granny Square Pattern
If you are a beginner, I recommend starting with this article first: “How to Crochet a Granny Square: 6 Easy Steps for a Beautiful Beginner Pattern.”


One Comment
Comments are closed.