

Easy Granny Square Crochet Pattern for Beginners
What Is an Easy Basic Granny Square Crochet Pattern?
An easy basic granny square crochet pattern is a classic 4-corner square made with clusters of double crochet stitches. It’s the foundation for most granny square projects.
Have you ever wanted to make a classic crochet granny square but felt unsure where to begin? This easy granny square crochet pattern is a simple place to start! With a few basic stitches, a crochet hook, and your favorite yarn, you can create a colorful square that works beautifully in blankets, bags, pillows, and other handmade projects.
In this step-by-step granny square crochet for beginners tutorial, you’ll learn how to make a traditional granny square using US crochet terms. We’ll cover the materials, basic stitches, each round of the pattern, and helpful tips for keeping your square neat and flat.
Whether you’re learning crochet for the first time or looking for a relaxing project, let’s make your first granny square!
Table of Contents
Why You’ll Love This Easy Granny Square Pattern
A classic granny square is one of those crochet projects you can return to again and again. Here are a few reasons to try it:
- Beginner-friendly stitches: The pattern mainly uses chain stitches and double crochet.
- Easy to customize: Choose one yarn color or change colors between rounds.
- Great for using leftover yarn: Combine colors you already have in your yarn stash.
- Useful for many projects: Join several squares to make blankets, bags, cushion covers, and more.
- Easy to make in different sizes: Add more rounds whenever you want a larger square.
The best part is that you can make one square at a time and join them together when you have enough.
Materials You’ll Need

For this easy granny square crochet pattern, medium-weight yarn works best. Before you begin this basic granny square crochet pattern, gather the following supplies.
- Yarn: Medium-weight yarn, also called worsted-weight yarn, is a practical choice for beginners.
- Crochet hook: Choose the hook size recommended on your yarn label. A 5 mm (H-8) hook is a common starting point for medium-weight yarn.
- Scissors: For cutting the yarn when you finish.
- Yarn needle: To weave in the loose ends.
- Stitch marker (optional): Helpful if you want to mark the beginning of a round.
You can use a single color for your first square or change colors to create a more colorful design.
Tip: Check your yarn label for the recommended hook size. If your stitches feel too tight, you may need a larger hook; if they feel too loose, try a smaller one.
Crochet Abbreviations You Need to Know
This tutorial uses US crochet terminology.
- ch: Chain
- sl st: Slip stitch
- dc: Double crochet
- st: Stitch
- sp: Space
- ch-sp: Chain space
- rep: Repeat
You can find standard US crochet terms on the Craft Yarn Council website.
How to Make a Double Crochet

To make a double crochet (dc), yarn over, insert your hook into the indicated stitch or space, and pull up a loop. You should have three loops on your hook.
Yarn over and pull through two loops. Yarn over again and pull through the remaining two loops.
That completes one double crochet.
If you already know how to chain and double crochet, you’re ready to begin.
Easy Granny Square Crochet Pattern
This traditional granny square is worked in joined rounds. Each round builds on the previous one, creating four corners and the familiar square shape.
Pattern details
- Skill level: Beginner
- Pattern type: Classic granny square
- Terminology: US crochet terms
- Construction: Worked in rounds
- Stitches used: Chain, slip stitch, and double crochet
Round 1: Make the Center
Start with a magic ring. If you prefer, you can chain 4 and join with a slip stitch to form a ring.
- Chain 3. This counts as your first double crochet.
- Work 2 double crochet into the ring.
- Chain 2.
- Work 3 double crochet into the ring, then chain 2.
- Repeat the previous step two more times.
- Join with a slip stitch to the top of the beginning chain 3.
You should now have four groups of three double crochet, separated by four chain-2 spaces. These spaces will form the corners of your granny square.
Tip: Keep your stitches relaxed enough for your hook to move comfortably, but avoid making the center ring so loose that it leaves a large hole.

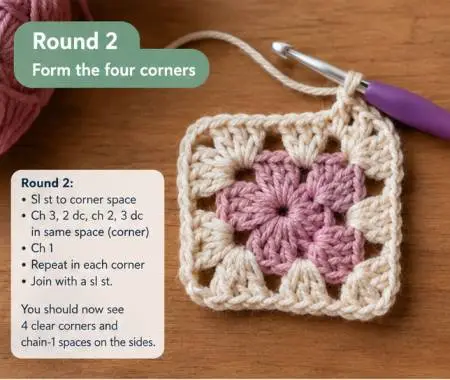
Round 2: Form the Four Corners
In this round, you’ll work into the chain-2 spaces from Round 1.
- Slip stitch across to the next chain-2 corner space.
- Chain 3, then work 2 double crochet into the same corner space.
- Chain 2, then work 3 double crochet into that same space. This creates your first corner.
- Chain 1.
- In the next corner space, work 3 double crochet, chain 2, and 3 double crochet.
- Chain 1, then repeat the corner instructions in each remaining corner space.
- After completing all four corners, chain 1 if needed to reach the starting point, then join with a slip stitch to the top of the beginning chain 3.
You should now see a small square with four clear corners and chain-1 spaces along its sides.
Check your work: Each corner should have two groups of three double crochet separated by a chain-2 space.
Round 3: Make the Square Larger
Now you’ll work into both the corner spaces and the chain-1 spaces along the sides.
- Slip stitch into the next corner space.
- Chain 3, then work 2 double crochet into the same corner space.
- Chain 2, then work 3 double crochet into the same space to complete the corner.
- Chain 1.
- In the next chain-1 space along the side, work 3 double crochet.
- Chain 1, then work the next corner as follows: 3 double crochet, chain 2, and 3 double crochet in the corner space.
- Continue around the square, working 3 double crochet in each side space and 3 double crochet, chain 2, and 3 double crochet in each corner space.
- Chain 1 between groups as needed, then join with a slip stitch to the top of the beginning chain 3.

Your square should now have a more visible border and longer sides.
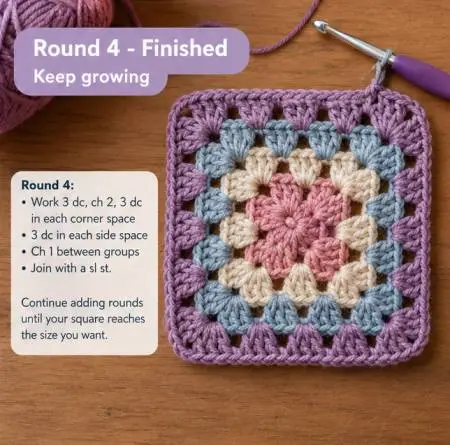
Round 4 and Beyond: Keep Growing Your Granny Square
You can continue adding rounds until your square reaches the size you want.
For each new round:
- Work a corner group of 3 double crochet, chain 2, and 3 double crochet in every corner space.
- Work 3 double crochet into each chain-1 space along the sides.
- Chain 1 between groups along the sides and when moving between corners.
- Join the round with a slip stitch to the top of the beginning chain 3.
As the square grows, you’ll have more side spaces to fill. Keep the corner groups consistent so the square maintains its shape.
How to Keep Your Granny Square Flat
A granny square should generally lie flat when placed on a table. If yours starts to curl, ripple, or look uneven, a few small adjustments may help.
- If the square curls upward: Your stitches may be too tight, or your hook may be too small. Try relaxing your tension or using a slightly larger hook.
- If the edges ripple: Your stitches may be too loose, or you may have added extra stitches or spaces. Check the pattern and count the groups along each side.
- If the corners look unclear: Make sure you’re working the complete corner group into each corner space.
- If the center has a large hole: Tighten the magic ring carefully, or pull the starting yarn tail if you used a chain ring.
Small differences in yarn and tension are normal. Focus on keeping your stitches consistent rather than making every stitch perfectly identical.
How to Finish Your Granny Square
Once your square reaches the desired size, finish it neatly.
- Complete the final round and join it with a slip stitch.
- Cut the yarn, leaving a tail long enough to weave in.
- Pull the yarn tail through the final loop and tighten gently.
- Thread the tail onto a yarn needle.
- Weave the tail through several stitches on the back of the square, changing direction where appropriate to help secure it.
- Repeat with any remaining loose ends.
Lay the square flat and gently adjust the corners. If needed, follow suitable blocking instructions for your yarn fiber.
Your classic granny square is now ready to use on its own or join with other squares.
What Can You Make With Granny Squares?
Once you’ve learned the basic technique, you can use granny squares in many handmade projects.
- Blankets: Join squares in rows to create a colorful blanket.
- Bags: Combine squares to make a tote bag or small shoulder bag.
- Pillow covers: Use squares to create a decorative cushion cover.
- Cardigans and vests: Join squares into wearable panels.
- Home decor: Make table runners, wall hangings, or other decorative pieces.
You can keep every square the same color or experiment with different color combinations to create your own style.
Frequently Asked Questions
Is this easy granny square crochet pattern good for beginners?
Yes, a classic granny square can be a good beginner project once you know how to make a chain and double crochet. Work slowly and check that each corner is formed correctly.
How many rounds should a granny square have?
There is no fixed number of rounds. You can stop when your square reaches the size you need. More rounds create a larger square.
Why is my granny square not square?
Uneven tension, missing corner stitches, or extra stitches can affect its shape. Check that every corner contains the correct group of stitches and that you have not skipped or added side spaces.
Can I use different colors?
Absolutely! You can use one color throughout or change colors between rounds. If you change colors, secure and weave in the loose ends neatly.
What can I make with granny squares?
Granny squares are commonly used for blankets, bags, pillow covers, clothing, and decorative projects. Joining several squares lets you create larger items.
Final Thoughts
Learning an easy granny square crochet pattern is a useful first step, and this granny square crochet for beginners guide will help you build your skills. Start with a few rounds, keep your corner spaces consistent, and practice until your stitches feel comfortable.
Every square is an opportunity to build your crochet skills and make something uniquely yours. Once you’ve made your first square, try experimenting with new colors or adding more rounds to create a larger design. Every square is an opportunity to build your crochet skills and make something uniquely yours.
Happy crocheting!

One Comment
Comments are closed.